WordPress is an incredibly popular platform, which is both a strength and a security challenge. With over 40% of websites built on WordPress, malicious bots are constantly scanning for WordPress sites to exploit. In fact, almost half of small businesses have experienced a cyber attack (costing an average of ~$8,700 per incident). The good news is that by taking some smart precautions, you can greatly reduce the risk of your WordPress site being hacked.
Below we’ll cover two key areas of WordPress security:
- “Hiding” WordPress – Simple steps to obscure that your site runs on WordPress (deter opportunistic attacks).
- Hardening Security – Essential measures to protect against takeovers, malware, and SQL injection attacks.
- Backup you Site – Even small updates, changes to your theme or layout and change your website. Backing it up regularly ensures you have a good know instance to recover from.
We’ll also discuss backups and monitoring as your safety net. The tone here is friendly and non-technical, with analogies to keep things relatable. Let’s get started!
1. Stealth Mode: Hiding Your WordPress Footprint
“Security through obscurity” isn’t a foolproof strategy, but it can stop a lot of automated attacks. Think of it like removing the sign from your shop front – a determined thief can still figure it out, but many opportunistic ones will pass by looking for an easier target. Here are simple ways to make it less obvious that your site runs on WordPress:
- Remove WordPress Version Info: Out-of-the-box, WordPress sites advertise their version number in the HTML source (in meta tags and RSS feeds). This is like wearing a badge that says “WordPress 5.8 here!” – useful to hackers if that version has known flaws. You can hide this by removing the generator meta tag. Many security plugins or lightweight code snippets can strip out the WordPress version from your site’s headers and feeds. (If you’re using a plugin like iThemes Security or WP Hide, just enable the option to remove version info.) [elegantthemes.com], [wordpress.org]
- Change the Default Login URL: By default, anyone can access your admin login page via
yoursite.com/wp-login.phpor/wp-admin. Bots commonly hit these URLs, attempting brute-force logins. You can confound them by changing your login page to a unique address. For example, setyoursite.com/mysecurelogininstead. This doesn’t make your site unhackable, but it dramatically cuts down random login attacks since bots won’t find the login form. A free plugin like WPS Hide Login or the all-in-one WP Hide & Security Enhancer can do this with one click. Be sure to bookmark the new URL for yourself! And remember, this hides the “front door” – you still need strong locks (we’ll get to passwords and 2FA in a moment). [wordpress.org], [wordpress.org] - Hide Common WordPress Paths: Hackers often look for standard WordPress file locations. For instance, they might request
/wp-content/plugins/plugin-name/readme.txtto see if you have a particular vulnerable plugin, or access/wp-includes/files. You can mitigate this in a few ways:- Disable Directory Browsing: Ensure your web server doesn’t allow listing of file directories. (Most hosts have this off by default. If not, adding
Options -Indexesin your.htaccessfile will disable it.) - Block Access to Sensitive Files: Important files like wp-config.php, .htaccess, and even the default readme.html should not be accessible publicly. You can add rules in .htaccess to deny access to wp-config.php and to the
.gitrepository if you have one. For readme.html and license.txt (which reveal your WP version), you can delete them or restrict access. Many security plugins automate this hardening step, or you can manually remove those files from your site’s root – it won’t affect your site to delete the readme.html file. - Use a Plugin to Rewrite Paths: For a more comprehensive camouflaging, plugins like WP Hide & Security Enhancer or Hide My WP (premium) can virtually rename the standard WordPress folders. For example, they can make
wp-content/uploadsexternally appear asassets/uploads(or any path you choose) without actually changing the folder structure. They also hide references towp-adminand block direct access to PHP files inwp-content. Essentially, these tools scrub many tell-tale “WordPress” signatures from your site’s HTML and URLs, thwarting bots that target known paths. Note: These plugins need careful setup and testing, as extreme changes can occasionally conflict with other plugins. Use if you’re comfortable, or get a developer’s help. [wordpress.org], [wordpress.org] [elegantthemes.com], [wordpress.org]
- Disable Directory Browsing: Ensure your web server doesn’t allow listing of file directories. (Most hosts have this off by default. If not, adding
- Hide the WordPress Branding (Frontend): Little things can give you away – for example, a theme that still has a “Proudly powered by WordPress” footer, or a login page that clearly looks like WP’s default. Most small business sites already use custom themes that remove the WordPress branding, but double-check your site doesn’t overtly mention WordPress in visible text. Customising your login page’s appearance (with your logo and colours) can also both hide WordPress and look more professional to users.
Does hiding WordPress make you bulletproof? No – if you’re running outdated or insecure software, a skilled attacker can still uncover and exploit it. But obscuring your site’s identity can deter the huge volume of automated attacks that scan for easy targets. It’s an optional layer of defence. Think of it as camouflage – it won’t stop a sniper, but it might avoid drawing the attention of roaming bandits on the web. Just be sure to pair this with the real defenses below. [elegantthemes.com]
2. Locking the Doors: Essential Security Measures
While hiding your CMS can help, robust security fundamentals are even more important. Here we’ll use another analogy: securing your website is like securing a house. You want strong locks, maybe an alarm system, regular maintenance on those locks, and good habits (like not leaving the keys under the mat). The following practices are your “strong locks and alarms” against malicious takeovers, malware injection, and SQL injections. Even if you’re not tech-savvy, these steps are accessible – and they make a world of difference for security.
Keep WordPress Core, Themes & Plugins Updated 🔄
Always update your WordPress installation, plugins, and themes to their latest versions. Updates often include security patches for newly discovered vulnerabilities. Running outdated software is like leaving a known hole in your fence – attackers will use it to slip in. Key tips: [developer….dpress.org], [syngrid.com]
- Enable Automatic Updates: Since WordPress 5.6, you can enable auto-updates for core, and for plugins/themes on an individual basis. At minimum, turn on auto-updates for WordPress core (which by default auto-applies minor security releases). For plugins and themes, consider enabling auto-update for those you trust won’t break your site; or schedule a routine (like weekly) to log in and apply updates manually after testing. [wordfence.com]
- Remove What You Don’t Use: Delete any inactive plugins or themes. Even if deactivated, they can pose risks if not updated. Plus, it’s less clutter to manage. Keep your environment lean – if you have an old “Twenty Fifteen” theme collecting dust, or a plugin you tried and deactivated, get rid of it. [elegantthemes.com], [syngrid.com]
- Use Trusted Sources: Only install plugins and themes from reputable marketplaces (WordPress.org repository, ThemeForest, etc.) or well-known developers. Never use “nulled” (pirated) premium plugins/themes from sketchy sites – they often contain hidden malware. It’s like buying a lock from a street vendor that’s been tampered with. [wordfence.com]
- Stay Informed: Occasionally, a severe vulnerability might be announced (for instance, a major plugin exploit). It’s good to follow a WordPress security blog or subscribe to plugin vulnerability alerts (there are services that email you if a plugin on your site has a known flaw). But if you keep auto-updates on, you’re likely covered; WordPress’s security team sometimes even force-pushes updates for critical issues. [wordfence.com]
By keeping everything updated, you’re plugging the biggest source of hacks. A large portion of WordPress attacks exploit sites running old versions with known holes. Update early and often – it’s the digital equivalent of locking every window and door.
Use Strong Passwords (and Manage Them) 🔑
Your admin password is effectively the master key to your website. Don’t leave it lying around or use a weak one. Here’s how to lock it down:
- Use a Strong, Unique Password for WordPress: This should be a complex passphrase or a random string of letters, numbers, symbols at least 12 characters long. Avoid dictionary words or anything related to your site’s name, your name, etc. For example,
JollyGood£X7Scotland92is a strong passphrase;Spring2023is not. If memorizing it is hard, use a password manager (like LastPass, 1Password, or even your browser’s built-in manager) so you don’t have to remember it. - No Reuse Across Sites: Make sure you’re not using that same password elsewhere (like your email or Facebook). If one of those gets breached, hackers will try the credentials on your WordPress site too. This is a common route in – not a “hack” of WordPress itself, but leaked credentials from elsewhere.
- Change Default Username: Don’t use “admin” as your username. It’s the first guess in any brute force attack. Instead, during setup either choose a custom admin username or, if your site is already using “admin,” create a new Administrator account with a unique username and strong password, then delete the old “admin” user (assign any posts it had to the new user). This way, attackers can’t rely on a default account. [syngrid.com]
A strong password policy instantly blocks a huge percentage of automated attacks. Think of weak passwords as a flimsy $2 lock – not worthy of protecting your online “property.” Use industrial-grade locks in the form of robust passwords. [syngrid.com]
Enable Two-Factor Authentication (2FA) 🔒📱
Even a strong password can be stolen (phishing, keyloggers, etc.). 2FA adds a second key that only you possess – usually a temporary code on your phone. Enabling 2FA for WordPress logins means that an attacker would need your password and your phone or physical token to get in. It’s like requiring a code from your security alarm in addition to the key.

For small business sites, you can set up 2FA easily with a plugin:
- Wordfence, iThemes Security, and Jetpack all offer two-factor login options.
- Or use a dedicated plugin like Two-Factor (by WordPress contributors) or Google Authenticator for WordPress.
- Typically these support app-based codes (using an app like Google Authenticator, Microsoft Authenticator, Authy, etc.) or email/SMS codes. App-based or a hardware token (see below) are more secure than SMS, but any 2FA is better than none.
Set it up at least for administrator accounts. Ideally, all users who can log in (including editors, authors) should use 2FA – because a compromised author account can still inject bad content. Many security plugins also offer login notifications, so you get an email if someone logs in (or a failed login occurs). That transparency helps catch if someone’s trying to break in.
For the truly security-conscious, you can use physical security keys (like YubiKey) which are USB/Bluetooth tokens that provide 2FA by a tap – very phishing-resistant. But this might be overkill for most small sites. Still, it’s worth noting that WordPress supports using them via plugins (they adhere to FIDO/U2F standards).
Analogy: 2FA is to your website login what a PIN is to your bank card. If the card (password) gets stolen, the thief still can’t withdraw money because they don’t know the PIN (2FA code). It massively lowers the chance of a break-in. In fact, Microsoft reported that 99.9% of compromised accounts did not have MFA enabled – which shows how effective it is. [elegantthemes.com]
Limit Login Attempts 🚫🔃
By default, WordPress allows unlimited login attempts. That means a bot can try password after password until it possibly hits the right one (this is called a brute force attack). We can curb this by limiting the number of tries: [elegantthemes.com]
- Install a Login Limiter: Many security plugins have this feature built-in (Wordfence, iThemes, Sucuri, etc., will automatically block an IP after X failed logins). If you’re not using a full security suite plugin, you can use a standalone plugin like Limit Login Attempts Reloaded. Set a reasonable limit, e.g. lock out for 15 minutes after 3 failed attempts, and permanently (or long-term) block those IPs after several lockouts.
- Use CAPTCHA on Login: Adding a CAPTCHA or honeypot to the login form can thwart automated bots. Google’s reCAPTCHA or simple math question plugins can work. Just make sure it’s compatible with your 2FA if that’s also on the form.
Limiting attempts means even if someone tries to brute-force guess your password, they get stopped after a few tries – akin to a door that locks shut and requires you to wait if too many wrong keys are tried. It’s an easy win for security. [elegantthemes.com]
(Bonus: If your site has user accounts (like a membership or customer logins), consider applying similar protections there. WooCommerce, for example, has extensions to add CAPTCHA to the checkout or login.)
Install a Security Plugin or Firewall 🛡️
Think of a Web Application Firewall (WAF) as your site’s alarm system and bouncer. It monitors traffic to block malicious requests – like someone jiggling all your door handles gets kicked off the property. Security plugins often come with a firewall and a suite of features:
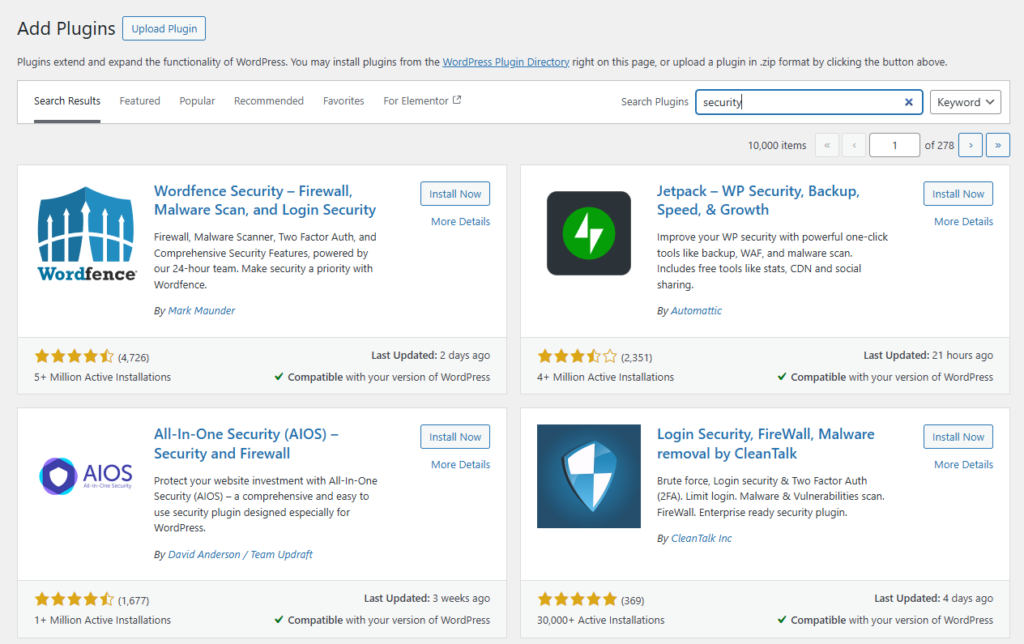
- Recommended Security Plugins: Popular ones include Wordfence Security, Sucuri Security, and All In One WP Security, or iThemes Security (aka Solid Security). These plugins can:
- Block malicious traffic (using firewall rules to filter out known attack patterns and IPs). [syngrid.com], [nixtree.com]
- Scan for malware on your site – they regularly check your files for suspicious code or changes, and some compare with their clean versions in the repository.
- Monitor file integrity – alerting you if core files or plugin files have been modified unexpectedly.
- Prevent brute-force logins – as discussed, by limiting attempts or enforcing 2FA/CAPTCHA.
- Scan for vulnerabilities – e.g., warn if you have an outdated plugin with a known flaw.
- Audit logs – keep a log of user actions (logins, edits) which is useful for accountability and investigating issues.
Many of these plugins have free versions that are quite robust. For example, Wordfence free includes a firewall that updates with a short delay, scanning, and login protection; Sucuri free includes file scanning and some hardening features (their cloud firewall is paid). Pick one and take some time to configure it. These tools often have a one-click “fix issues” button for recommended settings (like securing file permissions or turning off XML-RPC).
- Cloud WAF Option: Another route is to use a cloud-based firewall like Cloudflare or Sucuri’s cloud firewall. These sit between your site and the internet to filter traffic. Cloudflare’s free plan, for instance, offers basic DDoS protection and some firewall rules (you can set a rule to challenge or block traffic to
wp-login.phpfrom foreign countries, for example). Their Pro plan adds a Managed WAF which has specific WordPress rules. The advantage of a cloud WAF is it can block bad traffic before it even hits your server, reducing load. The disadvantage is complexity and cost for advanced features. If you’re not sure, a plugin-based firewall is absolutely fine to start with.
Whichever path, having a firewall is highly effective at stopping common attacks like SQL injection and XSS (cross-site scripting) before they do damage. For instance, if some old plugin has an SQL injection flaw, a good WAF can often detect and block the malicious query. It’s like an alarm that not only sounds but also automatically calls security when an intruder tries something fishy. [syngrid.com], [wpengine.com]
Tip: After installing a security suite, check its dashboard regularly, just as you might glance at your home’s security camera feed. You’ll likely see blocked attacks, which can be eye-opening (e.g., “Blocked 30 login attempts from Russia”). It feels good to know those bots are being shown the door.
Secure Your Website’s Weak Points 🛠️
Beyond the big-ticket items above, there are a few technical adjustments that significantly strengthen your site’s guard. If you’re not comfortable doing these yourself, your web developer or host can often help. They’re generally one-time set-and-forget tweaks:
- Set Proper File Permissions: Ensure your file permissions are restrictive enough. Files should generally be
644(readable by owner and server, but not writable by the world) and folders755or750(owner writable, not globally writable). Never set permissions to 777 (full write access for everyone) – that’s like leaving your safe wide open. Yourwp-config.php(which contains DB credentials) in particular should be well-protected – many guides recommend setting it to600or640so that it’s not readable by other accounts on the server. If using cPanel or a similar hosting panel, you can usually set permissions via the File Manager. If this is gibberish to you, ask your host – many hosts run scripts to automatically tighten permissions for security. [nixtree.com] - Disable File Editing in WP Admin: WordPress has a built-in editor that lets admin users edit plugin and theme files from the Dashboard (Appearance > Theme Editor). While convenient, it’s risky – if an attacker gets admin access, this is the first thing they’d use to execute code (e.g., injecting malware into your theme). You likely don’t need this feature (most folks edit files via FTP or never at all). Disable it by adding one line in your
wp-config.php:define('DISALLOW_FILE_EDIT', true);
This way, even if someone slips into your admin, they can’t modify plugin/theme PHP files from there. [nixtree.com] - Secure wp-config.php and .htaccess: As mentioned,
wp-config.phpholds sensitive info (DB name, user, password, and security keys). Apart from tightening file perms, you can add an extra layer by denying web access to it. If your server is Apache, add this to your.htaccessfile in the root: Apache Config<Files wp-config.php>
Require all denied
</Files>
Show more lines This returns a “forbidden” error to any direct request for wp-config. Similarly, you might restrict.htaccessitself and other config files. (On Nginx servers, you’d achieve similar via the config, but if you’re on managed WordPress hosting, they likely do it for you.) - Limit XML-RPC (if not needed): XML-RPC is a service WordPress provides to allow remote connections (e.g. posting via the WordPress mobile app or certain Jetpack features). It’s often abused by bots for brute force attacks or DDoS. If you’re not using it, you can disable it. Many security plugins have a one-click “Disable XML-RPC” setting. Or add
add_filter('xmlrpc_enabled', '__return_false');in your theme’s functions.php. At minimum, disable XML-RPC authentication if possible, which stops brute-force via that route. [wordpress.org] - Use HTTPS (SSL/TLS): By now, every site should be using HTTPS – not only for security (encrypting data in transit) but also for SEO and user trust (browsers mark non-HTTPS sites as “Not Secure”). Most hosts provide free Let’s Encrypt SSL certificates. Ensure your site’s URL is set to
https://in WordPress settings once you have a certificate, so all traffic is encrypted. This prevents attackers from snooping logins or cookie data over the network. [syngrid.com] - Database Security Measures: Your WordPress database is the treasure chest of your site (posts, users, settings). Protect it by:
- Using a strong database user password (your host likely set this when installing WordPress – make sure it’s not something guessable).
- Limiting the DB user’s privileges to just that database. Don’t use the MySQL root account for WordPress! Use a dedicated MySQL user that only has access to the WordPress database (most one-click installers do this).
- Changing the default table prefix
$table_prefixin wp-config fromwp_to something unique (e.g.,wpxy_). This can thwart some automated SQL injection scripts that assume table names. Note: changing this on an existing site requires running a script or plugin to update all table names – not hard, but do with caution or during initial setup. [elegantthemes.com] - Some security plugins will scan your database for known malicious entries (like injected spam links) as well.
- Guard Against SQL Injections: Aside from keeping things updated (which patches vulnerabilities that allow SQL injection), a WAF as discussed is your best friend. It will inspect incoming requests for malicious patterns (like strange queries in URL parameters). If you do have custom code that interacts with the database, ensure it uses prepared statements and proper escaping (this is more for your developer, but good to mention). If you’re purely using plugins, just keep them updated and use a firewall. [wpengine.com], [wpengine.com]
These measures fortify the lesser-thought-of entry points. To put it simply: if basic steps like updates and passwords are the front door and windows, these technical tweaks are reinforcing the back door and adding bars on the basement window – they close off obscure but impactful weaknesses.
Practice Principle of Least Privilege 👥🔑
If you have multiple users on your site (staff, contributors, etc.), manage their roles and permissions carefully:
- Give each user the lowest role necessary. For example, don’t make someone an Administrator if they only need to write blog posts – use the Editor or Author role. Fewer admin accounts = fewer high-value targets for attackers. [syngrid.com]
- Remove old user accounts that are no longer needed. If an employee or contractor leaves, don’t leave their login sitting around. Delete it or at least change the password.
- Use Editor instead of Admin when possible: If you as the business owner just need to publish pages and posts, consider using an Editor account for day-to-day work and have an Administrator account only for site/plugin management. You can keep the admin credentials in the password manager and not use them often. That way, if you fall for a phishing email for your main account, it doesn’t have full powers.
- Monitor user activity: Some plugins or services can log user changes (WordPress itself logs some things). If you have several admins, a plugin like Stream or WP Activity Log can record who did what. This helps accountability and quick detection if a user account is doing something fishy (whether due to compromise or misuse). [nixtree.com]
- Client Accounts: If you have a contact form or e-commerce, those customer accounts should not have any back-end access beyond their data. Just ensure no one has more permissions than they need.
This is akin to in a company – not everyone gets keys to the server room. Only those who truly need them. It limits damage if one account is compromised, and reduces mistakes too.
3. Backup Your Site Regularly 🗄️ (and Test Restorations)
Even the best security can’t guarantee 100% protection. That’s why backups are your ultimate insurance policy. If an attacker defaces your site or a software bug corrupts data, a recent backup means you can restore everything and be back in business quickly, without paying ransoms or rebuilding from scratch.
For a small business owner, setting up backups is a must-do but fortunately also a mostly set-and-forget task:
- Use a Backup Plugin or Service: Popular options include UpdraftPlus, Jetpack Backup (formerly VaultPress), BackupBuddy, BlogVault, or many others. UpdraftPlus, for example, has a free version that can do automated backups of your database and files on a schedule you choose. You can have it send backups to cloud storage like Google Drive, Dropbox, or OneDrive – meaning even if your server is wiped, your backup is safe. [nixtree.com], [nixtree.com]
- Schedule Backups Smartly: How often should you back up? Depends on how often your site content changes. A typically-updated business site (with occasional blog posts) might do fine with weekly backups. An e-commerce site or active blog should do daily. You can also do real-time backups that save changes continuously (Jetpack Backup does this, but it’s paid). The key is automating it – you don’t want to rely on remembering to click “Export” in WordPress occasionally.
- Keep Off-Site Copies: Storing backups on the same server as your website is risky – if the server is compromised, backups could be deleted too. Always send a copy off-site (to the cloud or another server). Most backup plugins support multiple remote destinations. Also, retain multiple backup points if possible (don’t overwrite the same backup file each time) – so you can roll back to an earlier point if needed.
- Test Your Backups: This is often forgotten: an untested backup might be no backup at all. At least once, try to restore your backup to a test environment or ask your web host to do a trial run. Make sure the backup files are not corrupted and contain what you expect. There’s nothing worse than thinking you have a backup, then finding out it wasn’t backing up correctly after it’s too late.
- Database Backups: Ensure your database (which holds all the content/users) is part of the backup. Almost all WP backup solutions include it by default. If you prefer manual, you can export the database via phpMyAdmin or WP-CLI, but a plugin is easier and less error-prone.
- Frequency vs. retention: A good practice might be daily backups retained for 30 days, plus weekly backups retained for a few months, etc. Adjust to your needs and storage limits. Most small sites could do fine with a rolling 7 daily backups, for instance.
Regular backups mean even if the worst happens, it’s a setback, not a catastrophe. It’s like having a spare key and copies of all important documents in a safe – it won’t stop the burglary, but you’ll be able to get back on your feet faster.
Monitoring and Maintenance 🔍
Security isn’t a one-time set-it-and-forget-it; it’s an ongoing process. However, with the right tools it doesn’t have to be a heavy burden. Here are some habits and tools for ongoing monitoring:
- Security Plugin Alerts: Make sure the security plugin/firewall you installed is set to email you important alerts (most default to this). For example, Wordfence can email when a plugin needs update, or if it finds malware, or if it blocked a large attack. Pay attention to these emails – they can often be your first indicator of an issue. If you get an email like “File changed: wp-content/plugins/someplugin/file.php and we don’t recognize the change,” don’t ignore it – investigate or have your web person investigate.
- Uptime Monitoring: Use a free uptime monitor service (like UptimeRobot or Better Uptime) to ping your site periodically. If your site goes down (which could be due to an attack or just a server issue), you’ll know right away and can respond.
- Scan Your Site Externally: In addition to internal scans, occasionally run your site through an external malware scanner such as Sucuri SiteCheck (sitecheck.sucuri.net) or Google Safe Browsing (via the Google Transparency Report). These tell you if your site is blacklisted or if they see malicious code from an outside view. It’s how customers might first see something (“This site may be harmful” warnings), so catching those early is key.
- Google Search Console: Ensure your site is registered on Google Search Console. Google will attempt to notify you there if it detects malware on your site (or if your site starts showing up with weird spam keywords, etc.). It’s another safety net for alerts.
- Review Logs: If you’re inclined, take a peek at your server logs or plugin logs once in a while. For example, many security plugins log all 404 errors or login attempts. If you notice a spike in activity, you might decide to tighten a firewall rule.
- Housekeeping: Set a periodic reminder (maybe monthly or quarterly) to review your site’s users, plugins, and settings. Things change over time: you might stop using a plugin and forget about it, or a new admin user was added for a developer which should later be removed. Regular check-ups keep the site healthy. Consider it a bit like changing the batteries in your smoke detector – not needed often, but don’t neglect it indefinitely.
By actively monitoring, you gain peace of mind. You’re more likely to catch issues early, before they escalate. Many attacks, if caught quickly, can be cleaned up with minimal damage (for instance, removing injected spam links) – but if left for months, they could hurt your SEO or spread to users.
Final Thoughts
Securing a WordPress site might sound intimidating, but for a small business owner, it really boils down to common-sense steps and using the right plugins/tools. You don’t need to be an IT guru to implement the measures above:
- Keep your site updated and use quality plugins/themes.
- Use strong passwords and add 2FA for an extra lock.
- Hide what you can (login page, version info) to avoid lazy attackers.
- Harden the sensitive areas (files, database) with one-time tweaks.
- Set up a security plugin to be your ever-vigilant guard.
- Back up everything so you can recover from any disaster.
- And stay alert via monitoring – security is an ongoing practice, not a one-off task. [nixtree.com]
Think of it like maintaining a car: you do routine oil changes, use an alarm, park in safe areas, and have insurance in case of a crash. Similarly, update your site, use a firewall, limit exposure, and have backups as insurance. Do these, and your WordPress site will be far less likely to give you any nasty surprises.
Your website is a crucial asset for your business and reputation. Taking the time to secure it is well worth the effort – and your future self (and your visitors) will thank you. With these measures in place, you can confidently focus on running your business, knowing that your website has a strong defence around it.
Stay safe online, and happy WordPress-ing!